| 일 | 월 | 화 | 수 | 목 | 금 | 토 |
|---|---|---|---|---|---|---|
| 1 | ||||||
| 2 | 3 | 4 | 5 | 6 | 7 | 8 |
| 9 | 10 | 11 | 12 | 13 | 14 | 15 |
| 16 | 17 | 18 | 19 | 20 | 21 | 22 |
| 23 | 24 | 25 | 26 | 27 | 28 | 29 |
| 30 |
Tags
- CI/CD
- CORS
- TS
- 호이스팅
- dfs
- useAppDispatch
- webpack
- 반공변성
- 태그된 유니온
- RTK Query
- Promise
- tailwind
- 투포인터
- 인증/인가
- async/await
- ESlint
- 무한 스크롤
- 인터섹션
- 공변성
- SSR
- Jest
- 리터럴 타입
- app router
- recoil
- React
- autosize
- MSA
- map
- 결정 알고리즘
- 타입 좁히기
Archives
- Today
- Total
짧은코딩
friends 페이지 본문
반응형
하단 바 만들기
-html
    <nav class="nav">
      <ul class="nav__list">
        <li class="nav__btn">
          <a class="nav__link" href="friends.html"><i class="fas fa-user fa-2x"></i></a>
        </li>
        <li class="nav__btn">
          <a class="nav__link" href="#"><i class="fa-regular fa-comment fa-2x"></i></i></a>
        </li>
        <li class="nav__btn">
            <a class="nav__link" href="#"><i class="fas fa-search fa-2x"></i></a>
        </li>
        <li class="nav__btn">
            <a class="nav__link" href="#"><i class="fas fa-ellipsis-h fa-2x"></i></a>
        </li>
      </ul>
    </nav>
-css
.nav {
  /* 아래에 고정 */
  position: fixed;
  bottom: 0;
  width: 100%; /* 이거 안하면 아이콘이 몰려있다. */
  background-color: #f9f9fa;
  padding: 20px 50px;
  box-sizing: border-box; /* 이거 해야 아래 고정 시 ellipsis도 보인다. */
  border-top: 1px solid rgba(121, 121, 121, 0.3);
}

.nav__list {
  display: flex;
  justify-content: space-between;
}

.nav__link {
  color: #2e363e;
}
이렇게 나오게 된다.
box-sizing
박스를 만들고 200px의 너비를 준다. 그리고 padding-left 50px를 준다.

이런식으로 구성이될 것이다. 그러면 결국 명령을 다 수행 시켜야해서 50px가 늘어나서 박스의 너비는 250px가 된다. 그래서 box-sizing이 없으면 ellipsis가 안보이게 된다.

결국 box-sizing: border-box를 해서 css에게 padding을 줘도 신경쓰지말고 box 사이즈를 늘리지 말라고 말한 것이다. 즉, 사진처럼 박스 총 너비는 늘려주지 않은 것이다.
채팅 몇 개 왔는지 알려주는 icon
-html
        <li class="nav__btn">
          <a class="nav__link" href="#">
            <!-- 톡 몇 개 왔는지 -->
            <span class="nav__notification">1</span>
            <i class="fa-regular fa-comment fa-2x"></i>
          </a>
        </li>
span으로 1을 만들어준다.
-css
.nav__link {
  position: relative;
  color: #2e363e;
}

.nav__notification {
  background-color: tomato;
  width: 30px;
  height: 30px;
  border-radius: 50%;
  display: flex;
  justify-content: center;
  align-items: center;
  color: white;
  font-weight: 600;
  /* absolute는 가장 가까운 relative를 가진 부모 기준으로 움직인다. */
  /* 그렇기에 .nav__link에 reltive를 줘야 한다. */
  position: absolute;
  left: 15px;
  bottom: 15px;
}
position을 이용해서 만들어준다. absolute를 사용할 때는 가장 가까운 relative를 가진 부모를 주의해야 한다.

이렇게 완성이 된다.
스크린 상단바 만들기
-html
    <header class="screen-header">
      <h1 class="screen-header__title">Friends</h1>
      <div class="screen-header__icons">
        <span><i class="fas fa-search fa-lg"></i></span>
        <span><i class="fas fa-music fa-lg"></i></span>
        <span><i class="fas fa-cog fa-lg"></i></span>
      </div>
    </header>
-css
.screen-header {
  display: flex;
  justify-content: space-between;
  align-items: center;
  padding: 25px;
}

.screen-header__title {
  font-size: 32px;
  font-weight: 600;
}

.screen-header__icons span {
  margin-left: 25px;
}
다른 페이지에서 재사용을 위해서 screen-header.css를 components에 만들어줬다.

이렇게 스크린 헤더를 만들어줬고 이 헤더는 다른 페이지에서 글자, 아이콘만 바꾸면 재사용이 가능하다.
프로필 부분
이 부분은 다른 페이지에서도 비슷하게 사용할 것이라서 컴포넌트화 해준다.
-html
    <div class="user-component">
      <div class="user-component__column">
        <img
          src="http://image.dongascience.com/Photo/2020/02/660b6c867334b842ab7f0258d1e35865.jpg"
          alt=""
          class="user-component__avatar"
        />
        <div class="user-component__text">
          <h4 class="user-component__title">꾸릉이</h4>
          <h6 class="user-component__subtitle">this text whatever</h6>
        </div>
      </div>
      <div class="user-component__column"></div>
    </div>
user-component__subtitle 부분은 다른 페이지에서 상태 메시지를 표현하는 부분도 미리 만들어주었다.
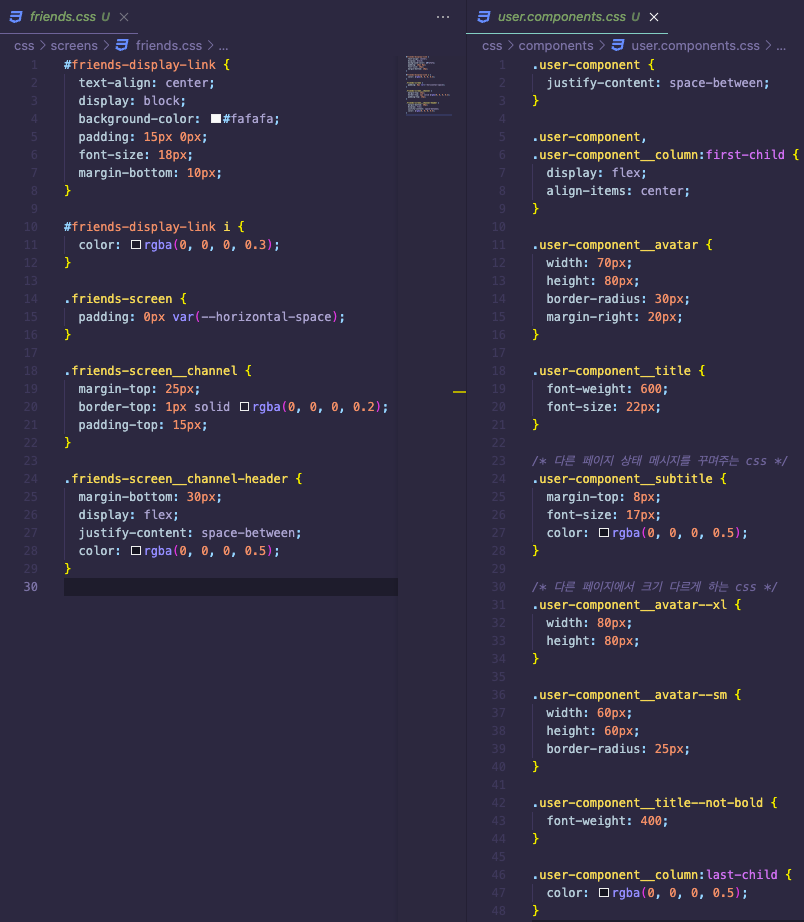
-css
.user-component,
.user-component__column:first-child {
  display: flex;
  align-items: center;
}

.user-component__avatar {
  width: 70px;
  height: 80px;
  border-radius: 27px;
  margin-right: 20px;
}

.user-component__title {
  font-weight: 600;
  font-size: 22px;
}

/* 다른 페이지 상태 메시지를 꾸며주는 css */
.user-component__subtitle {
  margin-top: 8px;
  font-size: 17px;
  color: rgba(0, 0, 0, 0.5);
}
마찬가지로 user-component__subtitle 부분도 미리 만들었다.

Channel 부분 만들기
-html
    <!-- main으로 감싸 준 이유는 왼쪽 여백을 통일하기 위해서 -->
    <main class="friends-screen">
      <div class="user-component">
        <div class="user-component__column">
          <img
            src="http://image.dongascience.com/Photo/2020/02/660b6c867334b842ab7f0258d1e35865.jpg"
            alt=""
            class="user-component__avatar user-component__avatar--xl"
          />
          <!-- 위에 클래스 이름을 2개로 준 이유는 다른 페이지에서는 사진 크기를 다르게 사용해서이다. -->
          <div class="user-component__text">
            <h4 class="user-component__title">꾸릉이</h4>
            <!-- <h6 class="user-component__subtitle">this text whatever</h6> -->
          </div>
        </div>
        <div class="user-component__column"></div>
      </div>
      <!-- Channel -->
      <div class="friends-screen__channel">
        <div class="friends-screen__channel-header">
          <span>Channel</span>
          <i class="fas fa-chevron-up fa-xs"></i>
          </div>
          <div class="user-component">
            <div class="user-component__column">
              <img
                src="http://image.dongascience.com/Photo/2020/02/660b6c867334b842ab7f0258d1e35865.jpg"
                alt=""
                class="user-component__avatar user-component__avatar--sm"
              />
              <!-- 위에 클래스 이름을 2개로 준 이유는 다른 페이지에서는 사진 크기를 다르게 사용해서이다. -->
              <div class="user-component__text">
                <h4
                  class="user-component__title user-component__title--not-bold"
                >
                  Channel
                </h4>
              </div>
            </div>
            <div class="user-component__column">
              <span>2</span>
              <i class="fas fa-chevron-right fa-xs"></i>
            </div>
          </div>
        </div>
      </div>
    </main>
-css
이렇게 만들어줬다.
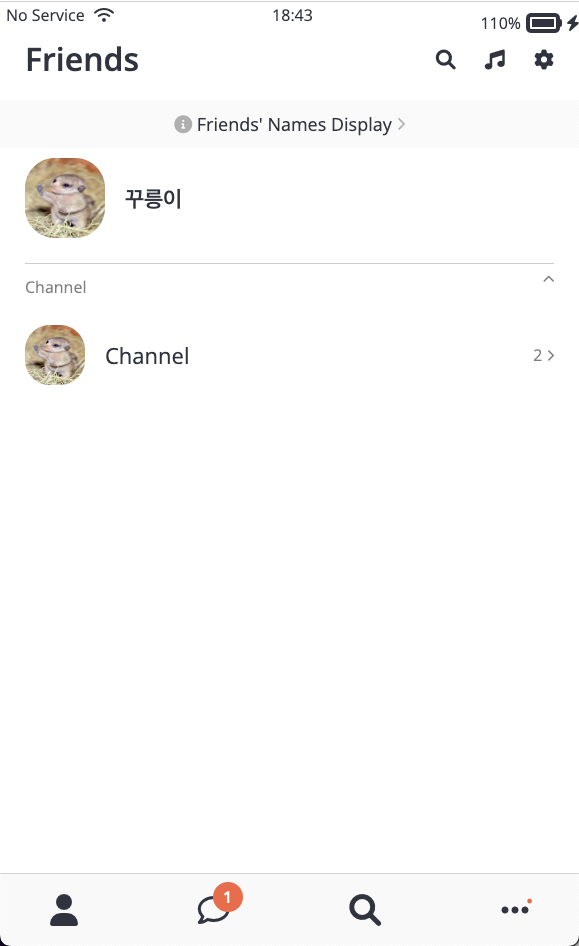
최종적으로 Friends 페이지도 완성이 되었다.
반응형
'노마드 코더 > 코코아톡 클론코딩' 카테고리의 다른 글
| More 페이지 (0) | 2022.07.02 |
|---|---|
| Chats 페이지 (0) | 2022.06.29 |
| Form의 속성 (1) | 2022.06.28 |
| 클론 코딩 시작 and login 페이지 (0) | 2022.06.24 |
| GIT and GITHUB (1) | 2022.06.23 |
'노마드 코더/코코아톡 클론코딩' Related Articles
more


Comments