| 일 | 월 | 화 | 수 | 목 | 금 | 토 |
|---|---|---|---|---|---|---|
| 1 | 2 | 3 | 4 | |||
| 5 | 6 | 7 | 8 | 9 | 10 | 11 |
| 12 | 13 | 14 | 15 | 16 | 17 | 18 |
| 19 | 20 | 21 | 22 | 23 | 24 | 25 |
| 26 | 27 | 28 | 29 | 30 | 31 |
- Jest
- async/await
- map
- 투포인터
- 결정 알고리즘
- SSR
- 리터럴 타입
- 공변성
- app router
- 반공변성
- 무한 스크롤
- recoil
- RTK Query
- dfs
- 호이스팅
- 태그된 유니온
- CI/CD
- ESlint
- autosize
- MSA
- TS
- webpack
- useAppDispatch
- React
- 타입 좁히기
- 인증/인가
- 인터섹션
- tailwind
- Promise
- CORS
- Today
- Total
짧은코딩
axios 분석 본문
axios 분석
axios는 XMLHttpRequest 기반이라 fetch보다 기능이 다양하다. 게다가 브라우저와 노드 모두 사용이 가능하다.
-가상 api 주소가 필요할 때 사용하는 주소 사이트
https://jsonplaceholder.typicode.com/
JSONPlaceholder - Free Fake REST API
{JSON} Placeholder Free fake API for testing and prototyping. Powered by JSON Server + LowDB. Tested with XV. As of Oct 2021, serving ~1.7 billion requests each month.
jsonplaceholder.typicode.com
-ts에서 함수에 속성 추가하기
const z = () => {};

z.a = "a";
z.b = "b";
ts는 이렇게 함수에 속성 추가가 가능하다.
import axios from "axios";

const z = () => {};

z.create=()=>{};

z();
z.create();
이런것도 가능하다.
-axios의 사용법 3가지
new axios();
axios();
axios.get();
이런 3가지 방법으로 사용이 가능하다. aixos를 보면 객체이자 함수이자 클래스이다. 따라서 위 3가지 방법으로 사용이 가능하다.
getUri(config?: AxiosRequestConfig): string;
  request<T = any, R = AxiosResponse<T>, D = any>(config: AxiosRequestConfig<D>): Promise<R>;
  get<T = any, R = AxiosResponse<T>, D = any>(url: string, config?: AxiosRequestConfig<D>): Promise<R>;
  delete<T = any, R = AxiosResponse<T>, D = any>(url: string, config?: AxiosRequestConfig<D>): Promise<R>;
  head<T = any, R = AxiosResponse<T>, D = any>(url: string, config?: AxiosRequestConfig<D>): Promise<R>;
  options<T = any, R = AxiosResponse<T>, D = any>(url: string, config?: AxiosRequestConfig<D>): Promise<R>;
  post<T = any, R = AxiosResponse<T>, D = any>(url: string, data?: D, config?: AxiosRequestConfig<D>): Promise<R>;
  put<T = any, R = AxiosResponse<T>, D = any>(url: string, data?: D, config?: AxiosRequestConfig<D>): Promise<R>;
  patch<T = any, R = AxiosResponse<T>, D = any>(url: string, data?: D, config?: AxiosRequestConfig<D>): Promise<R>;
  postForm<T = any, R = AxiosResponse<T>, D = any>(url: string, data?: D, config?: AxiosRequestConfig<D>): Promise<R>;
  putForm<T = any, R = AxiosResponse<T>, D = any>(url: string, data?: D, config?: AxiosRequestConfig<D>): Promise<R>;
  patchForm<T = any, R = AxiosResponse<T>, D = any>(url: string, data?: D, config?: AxiosRequestConfig<D>): Promise<R>;
이런식으로 표현이 되어있다. 리턴값은 Promise<R>이고 R은 Response를 의미한다.
-axios.get 예시 코드
import axios from "axios";

(async ()=>{
  try {
    const response = await axios.get('https://jsonplaceholder.typicode.com/posts/1');
    console.log(response.data);
    console.log(response.data.userId);
    console.log(response.data.id);
    console.log(response.data.title);
    console.log(response.data.body);
  } catch (error) {

  }
})();
이렇게 사용하면 요청은 잘된다.

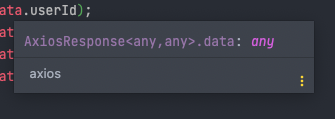
하지만 이렇게 any가 나오면 ts가 아니라 AnyScript이다. 이렇게 any면 문제가 있는 상황이다.
get<T = any, R = AxiosResponse<T>, D = any>(url: string, config?: AxiosRequestConfig<D>): Promise<R>;get에 있는 T 제네릭을 수정하면 타입을 지정할 수 있을 것 같다.
import axios from "axios";

interface Post {userId: number, id: number, title: string, body: string}

(async ()=>{
  try {
    const response = await axios.get<Post>('https://jsonplaceholder.typicode.com/posts/1');
    console.log(response.data);
    console.log(response.data.userId);
    console.log(response.data.id);
    console.log(response.data.title);
    console.log(response.data.body);
  } catch (error) {

  }
})();
따라서 이렇게 해주면 타입을 지정할 수 있다.
-Error 타입 지정
catch (error) {
    console.error((error as AxiosError).response?.data);
  }
error은 항상 기록해두는게 좋다. error은 unknown이다. 왜냐하면 axios 요청 문법 때문인지, 백엔드 문제인지, 다름 다른 에러 때문인지는 실행하기 전까지는 모르기 때문이다.
위 방법으로 하면 안좋은 점이 다음 줄에 error을 사용할 때 ts가 타입을 까먹어 버린다.
catch (error) {
    const errorResponse = (error as AxiosError).response;
    console.error(errorResponse?.data);
  }
따라서 이렇게 해주면 ts의 건망증이 사라진다. 하지만 치명적인 단점으로 만약 AxiosError이 아닌 오류가 발생하면 안된다.
catch에서 에러를 처리해줘야 하는데 여기서 에러가 발생하면 답이 없다.
catch (error) {
    if (error instanceof AxiosError) {
      error.response;
    }
    const errorResponse = (error as AxiosError).response;
    console.error(errorResponse?.data);
    errorResponse?.data;
  }
그렇기에 이렇게 커스텀 타입 가드를 사용하면 에러가 axios 에러라는 것이 고정된다. 이렇게 사용할 수 있는 이유는 axiosError이 클래스이기 때문이다.
catch (error) {
    if (axios.isAxiosError(error)) {
      console.error(
        (error.response as AxiosResponse<{ message: string }>)?.data.message
      );
    }
만약 reponse로 {message: '서버 장애입니다. 다시 시도해주세요'} 이런 메시지가 날라오면 위 코드처럼 타입을 강제 지정하면 된다.
하지만 as를 최대한 안쓰는 것이 좋은 코드이다.
'TS > TS(with ZeroCho)' 카테고리의 다른 글
| React with TS (0) | 2022.09.12 |
|---|---|
| Axios 만들어보기 (0) | 2022.09.07 |
| npm 사이트에서 JS, TS에 따른 설치법 (0) | 2022.08.25 |
| Utility Types (0) | 2022.08.21 |
| TS와 건망증 (0) | 2022.08.20 |


