| 일 | 월 | 화 | 수 | 목 | 금 | 토 |
|---|---|---|---|---|---|---|
| 1 | 2 | 3 | ||||
| 4 | 5 | 6 | 7 | 8 | 9 | 10 |
| 11 | 12 | 13 | 14 | 15 | 16 | 17 |
| 18 | 19 | 20 | 21 | 22 | 23 | 24 |
| 25 | 26 | 27 | 28 | 29 | 30 | 31 |
- 태그된 유니온
- webpack
- SSR
- CI/CD
- React
- app router
- 결정 알고리즘
- CORS
- 인증/인가
- ESlint
- useAppDispatch
- RTK Query
- 타입 좁히기
- 무한 스크롤
- MSA
- 투포인터
- async/await
- 인터섹션
- tailwind
- dfs
- recoil
- TS
- 리터럴 타입
- 공변성
- Jest
- 호이스팅
- autosize
- map
- Promise
- 반공변성
- Today
- Total
짧은코딩
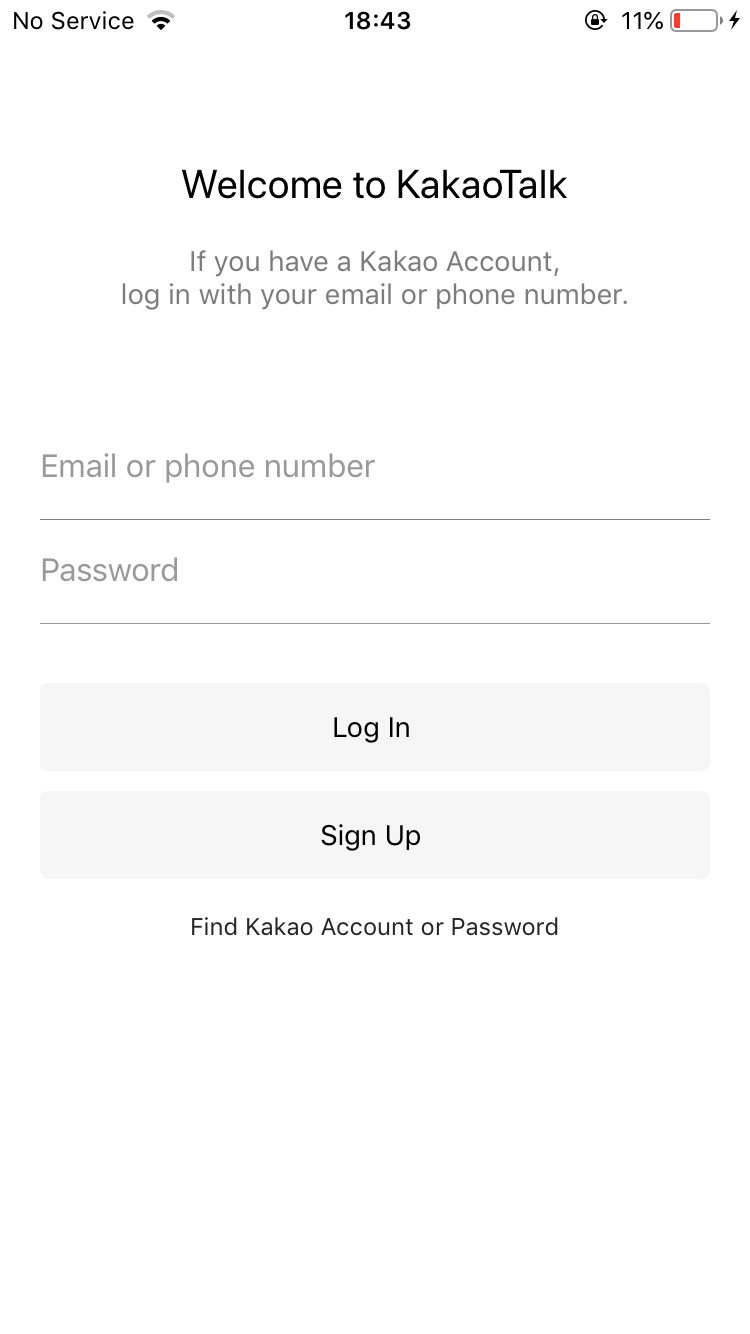
클론 코딩 시작 and login 페이지 본문
gitignore
깃허브 데스크탑에 .DS_Store라는 임시파일이 있다. 이건 맥os에서 만든 파일이다. 맥이나 윈도우에는 보이지 않는 임시파일이 있다. 따라서 업로드 하고 싶지 않으면 체크를 안하면 되는데 모든 커밋에서 이 파일을 업로드 하고 싶지 않다고 기억을 해야한다.
=> 이럴 경우에는 .gitignore를 만들면 된다. '.gitignore'는 무시하고 싶은 파일 이름을 기록하는 파일이다.
.DS_Store이렇게 쓰고 저장하면 커밋 창에서 .DS_Store가 사라진다. 어떤 폴더라도 무시가 가능하다.
BEM(Block Element Modifier)
좀 더 쉽게 읽히는 css를 가진다.
https://css-tricks.com/bem-101/
BEM 101 | CSS-Tricks
The following is a collaborative post by guest Joe Richardson, Robin Rendle, and a bunch of the CSS-Tricks staff. Joe wanted to do a post about BEM, which we
css-tricks.com
/* Block component */
.btn {}

/* Element that depends upon the block */
.btn__price {}

/* Modifier that changes the style of the block */
.btn--orange {}
.btn--big {}
__나 --를 사용한다. 모든건 클래스로만 사용되었다. 따라서 모든 부분에 클래스를 사용하는 것이 좋다. 이러면 어떤 클래스가 어떤 책임을 갖는지, 서로 관계는 어떻게 되는지 쉽게 이해할 수 있다.
아이콘
1. Heroicons
Heroicons
Beautiful hand-crafted SVG icons, by the makers of Tailwind CSS.
heroicons.com
원하는 아이콘을 찾아서 복사 붙여넣기를 해주면된다.
2. Font Awesome
Font Awesome
The world’s most popular and easiest to use icon set just got an upgrade. More icons. More styles. More Options.
fontawesome.com
여기가 제일 유명하다. 로그인을 하면 code kit을 주는데 이는 JS 파일이다. 그리고 body 태그 제일 아래 code kit을 붙여넣으면 된다.
02.png
index.html
<!DOCTYPE html>
<html lang="en">
  <head>
    <link rel="stylesheet" href="css/style.css" />
    <meta charset="UTF-8" />
    <meta http-equiv="X-UA-Compatible" content="IE=edge" />
    <meta name="viewport" content="width=device-width, initial-scale=1.0" />
    <title>Welcome to KoKoa Clone</title>
  </head>
  <body>
    <!-- Top bar -->
    <div class="status-bar">
      <div class="status-bar__column">
        <span>No Service</span>
        <!-- To Do: Wifi Icon -->
        <i class="fa-solid fa-wifi"></i>
      </div>
      <div class="status-bar__column">
        <span>18:43</span>
      </div>
      <div class="status-bar__column">
        <span>110%</span>
        <!-- Battry Icon -->
        <i class="fa-solid fa-battery-full"></i>
        <!-- Lightning Icon -->
        <i class="fa-solid fa-bolt"></i>
      </div>
    </div>
    <!-- Header -->
    <header class="welcome-header">
      <h1 class="welcome-header__title">Welcome to KakaoTalk</h1>
      <p class="welcome-header__text">
        If you have a Kakao Account, log in with your eamil or phone number.
      </p>
    </header>
    <!-- login -->
    <form id="login-form">
      <input type="text" placeholder="Email or phone number" />
      <input type="password" placeholder="Password" />
      <input type="submit" value="Lon In" />
      <a href="#">Find Kokoa Accountor or Password</a>
    </form>

    <!-- fontawesome -->
    <script
      src="https://kit.fontawesome.com/792e436c2b.js"
      crossorigin="anonymous"
    ></script>
  </body>
</html>
css
-style.css
@import url("https://fonts.googleapis.com/css2?family=Open+Sans:wght@400;600&display=swap");
body {
  font-family: "Open Sans", sans-serif;
}

.status-bar {
  display: flex;
  justify-content: space-between;
}

.status-bar__column: :first-child span {
  margin-right: 5px;
}
이렇게 두면 시간이 정확히 가운데가 아니다.

그렇기에 justify-content 대신 컨테이너 하나를 중심에 놓는 css hack(기술)을 사용해야 한다.
@import url("https://fonts.googleapis.com/css2?family=Open+Sans:wght@400;600&display=swap");
body {
  font-family: "Open Sans", sans-serif;
}

.status-bar {
  display: flex;
  justify-content: center;
}

.status-bar__column {
  width: 33%;
}

.status-bar__column:first-child span {
  margin-right: 5px;
}

.status-bar__column:nth-child(2) {
  display: flex;
  justify-content: center;
}

.status-bar__column:last-child {
  display: flex;
  justify-content: flex-end;
  align-items: center;
}

.status-bar__column .fa-battery-full {
  margin: 0px 5px;
}
1. 처음에 모두 가운데로 정렬한다.
2. 모두 같은 너비를 준다.
3. 가운데 자식을 flex 박스로 바꾸고 가운데로 정렬
4. 오른쪽 자식도 flex 박스로 바꾸고 끝으로 정렬, 각 아이콘의 위치를 맞춰주기 위해 반대축으로 정렬
-reset.css
브라우저는 알아서 html에 css를 적용시킨다. 그렇기 때문에 위는 reset css를 사용해서 초기화 시켜줘야한다.
https://meyerweb.com/eric/tools/css/reset/
CSS Tools: Reset CSS
CSS Tools: Reset CSS The goal of a reset stylesheet is to reduce browser inconsistencies in things like default line heights, margins and font sizes of headings, and so on. The general reasoning behind this was discussed in a May 2007 post, if you're inter
meyerweb.com
이 사이트에 가면 reset css가 나온다. 그리고 reset.css를 만들고 style.css에 적용시켜준다.
혹은 프로젝트 모든 속성에 적용하고 싶은 것은 reset.css에 적으면 좋다.
-style.css
@import "reset.css";이런 방법은 html에 link를 여러 줄 만들고 싶지 않을 때 유용하다.

그리고 status-bar도 분리해서 놓으면 더 좋은 코드가 된다.
-variables.css
여기에는 root를 이용해서 내 입맛에 맞는 속성들을 만들어 놓는다.
:root {
  --yellow: #fae100;
}
-not
https://developer.mozilla.org/ko/docs/Web/CSS/:not
:not() - CSS: Cascading Style Sheets | MDN
부정(negation) CSS 가상 클래스 :not(X)는 인수로 간단한 선택자(selector) X를 취하는 기능 표기법입니다. 인수로 표시되지 않은 요소와 일치합니다. X는 다른 부정 선택자를 포함해서는 안 됩니다.
developer.mozilla.org
not은 id에서 사용 가능하다. not을 사용하면 같은 태그이지만 특정 클래스를 가지지 않는 경우에만 적용해 줄 수 있다.
/* input type이 submit가 아닐 때 만 적용*/
#login-form input:not([type="submit"]) {
  border-bottom: 1px solid rgba(0, 0, 0, 0.2);
  transition: border-color 0.3s ease-in-out;
}
이렇게 사용이 가능하다.
-inherit
#login-form a {
  text-align: center;
  text-decoration: none;
  /* inherit은 부모로부터 상속 받는것을 말한다. default색은 블랙이라 검정이 나옴*/
  color: inherit;
}
inherit을 사용하면 부모로부터 상속을 받는다. 기본 색은 검정색이다.
완성본

이렇게 정리해줬다.
-html
<!DOCTYPE html>
<html lang="en">
  <head>
    <link rel="stylesheet" href="css/style.css" />
    <meta charset="UTF-8" />
    <meta http-equiv="X-UA-Compatible" content="IE=edge" />
    <meta name="viewport" content="width=device-width, initial-scale=1.0" />
    <title>Welcome to KoKoa Clone</title>
  </head>
  <body>
    <!-- Top bar -->
    <div class="status-bar">
      <div class="status-bar__column">
        <span>No Service</span>
        <!-- To Do: Wifi Icon -->
        <i class="fa-solid fa-wifi"></i>
      </div>
      <div class="status-bar__column">
        <span>18:43</span>
      </div>
      <div class="status-bar__column">
        <span>110%</span>
        <!-- Battry Icon -->
        <i class="fa-solid fa-battery-full fa-2x"></i>
        <!-- Lightning Icon -->
        <i class="fa-solid fa-bolt"></i>
      </div>
    </div>
    <!-- Header -->
    <header class="welcome-header">
      <h1 class="welcome-header__title">Welcome to KakaoTalk</h1>
      <p class="welcome-header__text">
        If you have a Kakao Account, log in with your eamil or phone number.
      </p>
    </header>
    <!-- login -->
    <form id="login-form">
      <input type="text" placeholder="Email or phone number" />
      <input type="password" placeholder="Password" />
      <input type="submit" value="Log In" />
      <a href="#">Find Kokoa Accountor or Password</a>
    </form>

    <!-- fontawesome -->
    <script
      src="https://kit.fontawesome.com/792e436c2b.js"
      crossorigin="anonymous"
    ></script>
  </body>
</html>
-css
@import url("https://fonts.googleapis.com/css2?family=Open+Sans:wght@400;600&display=swap");
@import "reset.css";
@import "status-bar.css";
@import "variables.css";

body {
  font-family: "Open Sans", sans-serif;
}

.welcome-header {
  margin: 90px 0px;
  text-align: center;
  display: flex;
  flex-direction: column;
  align-items: center;
  font-weight: 600;
}

.welcome-header__title {
  margin-bottom: 20px;
  font-size: 25px;
}

.welcome-header__text {
  /* 2줄을 가지도록한다. */
  width: 60%;
  /* 회색처럼 보인다. */
  opacity: 0.7;
}

#login-form {
  display: flex;
  flex-direction: column;
  margin: 0px 3px;
}

#login-form input {
  border: none;
  padding: 15px 0px;
  font-size: 18px;
  margin-bottom: 25px;
}

/* input type이 submit가 아닐 때 만 적용*/
#login-form input:not([type="submit"]) {
  border-bottom: 1px solid rgba(0, 0, 0, 0.2);
  transition: border-color 0.3s ease-in-out;
}

#login-form input::placeholder {
  color: rgba(0, 0, 0, 0.4);
}

/* 포커스되면 색 변함 */
#login-form input:focus {
  border-color: var(--yellow);
}

#login-form input[type="submit"] {
  background-color: var(--yellow);
  cursor: pointer;
  padding: 20px 0px;
  border-radius: 5px;
}

#login-form a {
  text-align: center;
  text-decoration: none;
  /* inherit은 부모로부터 상속 받는것을 말한다. default색은 블랙이라 검정이 나옴*/
  color: inherit;
  font-size: 13px;
}
로그인 페이지가 완성이 되었다.
'노마드 코더 > 코코아톡 클론코딩' 카테고리의 다른 글
| friends 페이지 (1) | 2022.06.28 |
|---|---|
| Form의 속성 (1) | 2022.06.28 |
| GIT and GITHUB (1) | 2022.06.23 |
| ADVANCED CSS (0) | 2022.06.21 |
| CSS (0) | 2022.06.12 |


