
| 일 | 월 | 화 | 수 | 목 | 금 | 토 |
|---|---|---|---|---|---|---|
| 1 | ||||||
| 2 | 3 | 4 | 5 | 6 | 7 | 8 |
| 9 | 10 | 11 | 12 | 13 | 14 | 15 |
| 16 | 17 | 18 | 19 | 20 | 21 | 22 |
| 23 | 24 | 25 | 26 | 27 | 28 |
- async/await
- 호이스팅
- recoil
- ESlint
- 반공변성
- React
- SSR
- webpack
- tailwind
- map
- 투포인터
- CORS
- Jest
- 결정 알고리즘
- Promise
- 이분 검색
- 타입 좁히기
- autosize
- useAppDispatch
- 리터럴 타입
- dfs
- app router
- 태그된 유니온
- Cypress
- 무한 스크롤
- TS
- CI/CD
- 인터섹션
- 공변성
- RTK Query
- Today
- Total
짧은코딩
CSS 본문
box
-block과 inline
block: 옆에 다른 요소가 못 오는 것
inline: 같은 줄에 위치할 수 있다.
block은 높이와 너비가 있다.
inline은 높이와 너비를 가질 수 없다.
=> inline은 박스가 아니다.
-margin, border, padding
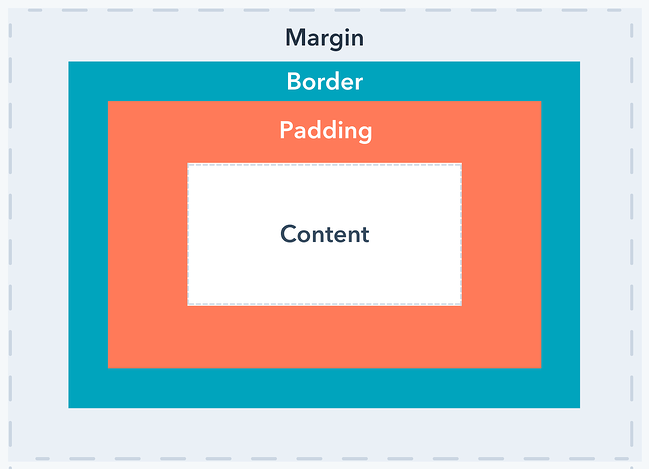
박스의 3가지 특징은 margin, border, padding을 가진다.
margin: border의 바깥에 있는 공간
쉽게 사용하는 방법
margin-top: 1;
margin-right: 2;
margin-bottom: 3;
margin-left: 4;
margin: 1 2 3 4;
2개로 주면
margin: 20px 15px;위, 아래는 20px, 왼쪽, 오른쪽은 15px이다.
-collapsing margins
  <head>
    <title>Vanilla Challenge</title>
    <meta charset="UTF-8" />
    <style>
      * {
        background-color: tomato;
      }
      body {
        margin: 20px 5px 12px 99px;
        background-color: thistle;
      }
      div {
        margin: 80px 15px;
        height: 150px;
        width: 150px;
        background-color: whitesmoke;
      }
    </style>
  </head>

  <body>
    <div></div>
  </body>
이렇게 하면 div의 위, 아래 margin만 변경하고 싶은데 전체의 위, 아래 margin이 변경된다. 이런 현상을 collapsing margins라고 한다. body와 div의 경계가 서로 같다면 두 margin은 하나로 취급되고 위, 아래 경계에서만 적용된다.
만약 body의 margin을 지워도 위쪽 margin은 그대로이다.
=> 그냥 경계가 같아서 일어나는 현상이라고 생각하면 된다.
Class
-class
class는 여러 개의 값을 가질 수 있다.
<div class="hi hello bye"></div>
그리고 이렇게 띄어서 쓰면 여러 개의 클래스를 가질 수 있다. 또 같은 이름의 클래스를 사용할 수 있다.
반대로 id는 유일해야 한다.
Flex
flex는 부모에게만 명시하면 되고 자식에게는 명시할 필요가 없다.
https://shortcoding.tistory.com/121
CSS-가상 셀렉터, flexbox
가상 셀렉터 가상 셀렉터에는 가상 클래스와 가상 엘리먼트가 있고 선택된 요소에 특별한 상태나 특정 부분을 선택할 수 있는 셀렉터이다. :virtual selector와 같이 사용된다. 1. 가상 클래스 가상
shortcoding.tistory.com
이전에 정리한거 참고.
position
-fixed
fixed는 아무리 스크롤을 내려도 박스가 계속 그 자리에 고정된다.
맨 처음 고정된 자리에 계속 고정되어 있고 만약 다른 위치에 고정시키고 싶으면 top, left, right, bottom을 사용하면 된다.
-static
static은 박스를 처음 위치하는 곳에 두는 것을 말한다.
static이 디폴트이다.
-relative
relative는 아주 조금씩만 옮기고 싶을 때 유용하다.
position: relative;
top: -10px;
left: -10px;
이렇게 top: -10px을 하면 content가 위로 올라가고, left: -10px를 하면 왼쪽으로 이동한다.
=> 처음 위치를 기준으로 옮기는 것이다.
-absolute
absolute는 가장 가까운 relative 부모를 기준으로 이동 시켜준다.
position: absolute;
bottom: 0;
이 코드로 하면 content가 맨 아래로 이동한다.
만약 position이 relative인 부모 박스가 없으면 body를 기준으로 해서 움직인다.
position이 realtive인 부모 박스가 있으면 그 박스 안에서 움직인다.
=> absolute와 relative가 제일 중요하다.
Pesudo Selectors
예를 들어 .hello 클래스 안에 여러 개의 div들 중 마지막 div를 바꾸고 싶다면
div:last-child {
}
이런식으로 하면된다. 그리고 첫번째 자식은 div:first-child이다.
만약 2번째를 변경하고 싶으면
div:nth-child(2) {
}
이렇게 하면된다.
만약 짝수 번째를 다 변경하고 싶으면
div:nth-child(even) {
}
홀수는 odd로 하면된다.
2n을 넣게되면
div:nth-child(2n) {
}
even을 한 것처럼 보일 것이다. 2n+1을 하면 홀수번째 적용이 된다.
3n+1을 하면

이런식으로 3개씩마다 바뀐다.
-부모 태그에 속성 넣기
p 태그 안에 있는 span 태그에 속성을 넣을라면
p span {
}
이렇게 해주면 된다. 원하는 만큼 부모를 써 줄 수 있다.
바로 밑의 자식 태그에게만 적용하려면
div > span {
}
이번엔 자식 태그가 아닌 자신의 뒤에 오는 형제 태그, 즉 밖에 있는 바로 뒤에 오는 태그에 속성을 주려면
p + span {
}
만약 span이 p의 형제인데 바로 뒤에 오지 않을 때
p ~ span{
}
from에서 required만 수정할 때
<style>
      input:required {
        border: 1px solid tomato;
      }
    </style>
  </head>
  <body>
    <div>
      <form>
        <input type="text" placeholder="username" />
        <input type="password" required placeholder="password" />
      </form>
    </div>
  </body>
이런 결과가 나온다.
required가 아닌 것을 수정하려면 optional로 하면된다.
-attribute selectors
 input[placeholder="username"] {
        background-color: thistle;
      }
    </style>
  </head>
  <body>
    <div>
      <form>
        <input type="text" placeholder="username" />
        <input type="password" required placeholder="password" />
      </form>
    </div>
  </body>
저렇게 input[placeholder="username"]으로도 속성을 수정해줄 수 있다.
  input[placeholder~="name"] {
        background-color: thistle;
      }
    </style>
  </head>
  <body>
    <div>
      <form>
        <input type="text" placeholder="first name" />
        <input type="text" placeholder="last name" />
        <input type="password" required placeholder="password" />
      </form>
    </div>
  </body>
~=을 사용하면 name이란게 들어간 태그만 수정이 가능하다.

이렇게 나온다.
https://developer.mozilla.org/ko/docs/Web/CSS/Attribute_selectors
특성 선택자 - CSS: Cascading Style Sheets | MDN
CSS 특성 선택자는 주어진 특성의 존재 여부나 그 값에 따라 요소를 선택합니다.
developer.mozilla.org
여기 가면 더 자세히 나와있다.
States
https://developer.mozilla.org/ko/docs/Web/CSS/Pseudo-classes
의사 클래스 - CSS: Cascading Style Sheets | MDN
CSS 의사 클래스(가상 클래스)는 선택자에 추가하는 키워드로, 선택한 요소가 특별한 상태여야 만족할 수 있습니다. 예를 들어 :hover를 사용하면 포인터를 올렸을 때에만 글씨 색을 바꾸고 싶을
developer.mozilla.org
마우스가 올라갔는지 안올라갔는지 등의 상태를 체크해서 변경할 수 있다.
focus되면 border의 색이 바뀌게 하기
<style>
      form {
        border: 1px solid salmon;
        display: flex;
        flex-direction: column;
        padding: 20px;
      }
      form:focus-within {
        border-color: seagreen;
      }
    </style>
  </head>
  <body>
    <div>
      <form>
        <input type="text" name="" id="" />
        <input type="text" name="" id="" />
        <input type="text" name="" id="" />
      </form>
    </div>
  </body>
평소에는 salmon 색이다가 focus되면 seagreen색이 되도록 하는 코드이다. within을 사용하여 만들 수 있다.

form에 마우스가 올라가면 input 색이 바뀌는 코드
form:hover input {
background-color: sienna;
}
-placeholder만 꾸미기
      input::placeholder {
        color: yellowgreen;
      }
    </style>
  </head>
  <body>
    <div>
      <form>
        <input type="text" placeholder="name" />
      </form>
    </div>
  </body>
::을 활용하면 placeholder 안의 글자를 꾸며줄 수 있다.
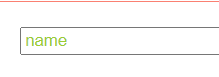
이렇게 나온다.
-selection
  <style>
      p::selection {
        color: white;
        background-color: yellowgreen;
      }
    </style>
  </head>
  <body>
    <p>가나다라마바사아자차카타파하</p>
  </body>

드레그하면 그 문자를 꾸며준다.
-first-letter
<style>
      p::first-letter {
        font-size: 200px;
        color: white;
        background-color: yellowgreen;
      }
    </style>
  </head>
  <body>
    <p>가나다라마바사아자차카타파하</p>
  </body>
이렇게 하면 첫번째 문자면 바꿔줄 수 있다. first-line도 쓸 수 있다.
Colors
색은 매우 중요하다. 색을 표현하는 방법은 3가지 방법이 있다.
1. 16진수 컬러
2. rgb 방식, rgba 방식(a는 투명도를 나타내고 0.5가 50%, 1이 100%이다.)
3. 사람들이 이름을 붙여준 것
구글에 color picker를 검색하면 색을 볼 수 있다.
-root
<style>
      :root {
        --main-color: #fcce00;
        --default-border: 1px solid var(--main-color);
      }
      p {
        background-color: var(--main-color);
      }
    </style>
  </head>
  <body>
    <p>가나다라마바사아자차카타파하</p>
  </body>
이런식으로 root를 사용하면 색을 하나 지정해두고 변수명을 이용하여 사용할 수 있다.
색만 저장할 수 있는 것이 아니라 --default-border처럼도 저장하여 사용할 수 있다.
용어들
-vh
vh는 viewport height를 말하는데 screen으로 생각해도된다. 100 screen height는 화면 높이이의 100%를 말한다.
-opacity
https://developer.mozilla.org/ko/docs/Web/CSS/opacity
opacity - CSS: Cascading Style Sheets | MDN
opacity CSS 속성은 요소의 불투명도를 설정합니다.
developer.mozilla.org
content의 투명도를 결정해준다.
'노마드 코더 > 코코아톡 클론코딩' 카테고리의 다른 글
| Form의 속성 (1) | 2022.06.28 |
|---|---|
| 클론 코딩 시작 and login 페이지 (0) | 2022.06.24 |
| GIT and GITHUB (0) | 2022.06.23 |
| ADVANCED CSS (0) | 2022.06.21 |
| HTML (0) | 2022.05.31 |


